
SmartLamp Controller
Control white and color (RGB) LEDs using a rotary encoder knob. An integrated motion detector input accommodates PIR or newer Radar type sensors. RS-485 network for automated, centralized control. Or can be used with PC/terminal program to set options.
The SmartLamp Controller can be reprogrammed similar to other Arduino boards using a low cost USB-ISP programming adapter.
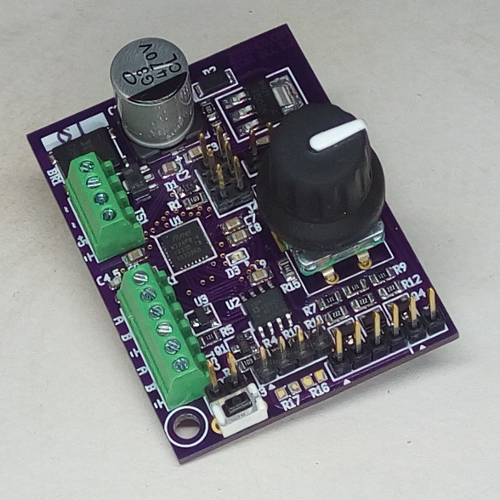
Measuring only 1.5" x 2", this device can fit into tight spaces. There are many options for mounting the encoder knob and connectors for maximum flexibility.
Features of the PCB
|
|
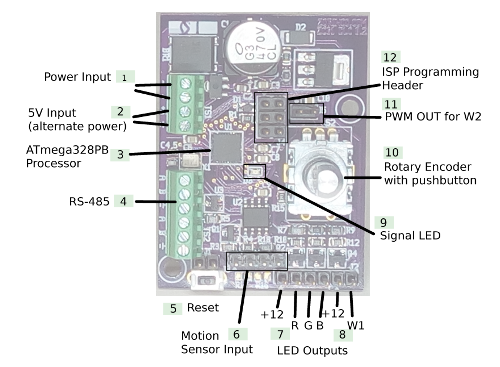
1,2 Power Input: Maximum input voltage: DC 31V or AC 22V.
For programming/testing when output LEDs are not needed, the board can be powered with 5VDC using the alternate power input pins. This can also be used to power other devices at very small loads.
Note, that the input voltage is rectified, and this is labeled +12. The input voltage may be limited by the type of LEDs being used. If 12V LEDs are used, then the input voltage should be 12-13VDC or 10-11VAC so the output will be the needed 12V the LEDs require.
3 The 'PB' version of the popular ATmega328 processor adds new communications and I/O lines over previous versions. Details on how the pins are used See the Technical Page.
4 RS-485 network. Two sets of terminals provided including ground if shielded cable is used. Twisted pair wire, up to 4,000 feet should be used. Shielded wire is normally not necessary.
6 Motion sensor input: The pin header for motion sensor input can accommodate both older Passive Infrared (PIR) style detectors, and newer 'radar' type devices. Each has unique electrical requirements. Because of this, extra component positions are provided. See the Technical Page for more details.
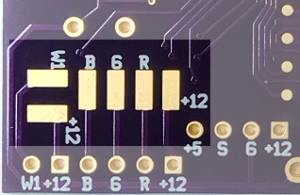
7,8 Connections to LEDs can be made either with the 0.1" center pins soldered to the front or back of the board. All LED connections are also available as solder pads on the back. Soldering directly is better when higher current is required.
7 Three 1.4A outputs intended for RGB LEDs. These outputs do not have protection diodes, so these are not recommended for magnetic loads.
8 Output intended for higher power white LEDs. This output includes a protection diode, so it can also be used for magnetic loads. The pin header/connectors are good up to a few amps. If your application requires higher current, we recommend using the direct solder pads on the back.
9 The amber status LED is designed so it can shine through a drilled hole next to the rotary encoder if mounting on a panel. The LED is wired to "digital output 13", consistent with other Arduino style boards.
10 The rotary encoder features a push button. It can be mounted on the front or the back of the board, to accommodate different mounting requirements (though small code change required to reverse rotation).
11 An extra PWM output is provide as a pair of pin headers. This is intended for places where multiple white lights may be needed. Such as ceiling light plus task lighting. This is a PWM output, and will require an external LED driver designed to take PWM input.
11 The SLC board can be programmed similar to other Arduino boards using the standard ISP header.
Built in firmware
The SmartLamp Contoller comes with built in firmware so programming is not normally needed. The firmware can be modified or replaced using standard Arduino program.
The included firmware controlls all connected LEDs using the rotary encoder or via commands sent over the RS-485 interface. It uses the optional motion sensor input, to dim the lights when there is no activity.
Normal Modes When using the rotary encoder, several modes control which LEDs are changed when the knob is turned. The built in indicator LED flashes to indicate the active mode. Normal modes are accessed with a press and release the rotary encoder knob. The status LED will flash to indicate what mode is set. Approximately 10 seconds after the knob is turned, the unit will return to mode one, and flash once to show that. This is so the next time you turn the knob, the white light changes, as you'd expect of a lamp.
Special modes These are accessed by pressing and holding the encoder knob. The status LED will flash for special modes, with long flashes.
For special purposes, there are additional 'Extra special modes'. These are mainly for production testing and debugging. They are accessed by holding down the encoder knob, while at the same time, pressing the reset button. There will be 10 very rapid flashes of the status LED. Then clicking the encoder knob can be used to select the particular Extra Special Mode desired.
Flash codes reference
| PRESS KNOB, then LED flashes to indicate active mode: | |
| ▪ | White #1 brightness |
| ▪ ▪ | Color |
| ▪ ▪ ▪ | Color brightness |
| Special modes: HOLD KNOB, the LED long flashes to indicate special mode. Let go to activate the special mode when the LED flashes the desired number of times. | |
| ▬ | All off |
| ▬ ▬ | Rainbow mode (auto color changing) |
| Extra Special modes (debug features): HOLD KNOB while pressing reset, rapid flashes, then click knob for Extra Special Modes the LED long flashes to indicate special mode. Let go to activate the special mode when the LED flashes the right number of times. | |
| ▪ | All outputs on at 100% for 3 sec (useful for measuring total current draw) |
Additional features:
If a motion sensor is connected, it will be detected on power up. It is assumed that the motion sensor will be in 'detection mode' at startup (since someone is assumed to be near the device when power is connected. This state is saved as the 'detection state'. When you leave the room, it will see the change, and see this as 'person has left the room'. Output channels will be reduced to 10%. When the motion detector senses a person, brightness increases to full again. If no motion detector is installed, the initial 'detection state' will never changes, and no dimming will occur. The reason this scheme is used is to accommodate various types of motion sensors (normally open, normally closed, etc)
Additionaal details are available on the Technical Page.
We offer engineering and production services. We can adapt our products to your specific needs or product ideas.
Contact us to learn more.
These products are now sold as part of consulting projects only.
For information on obtaining products you can contact us here.